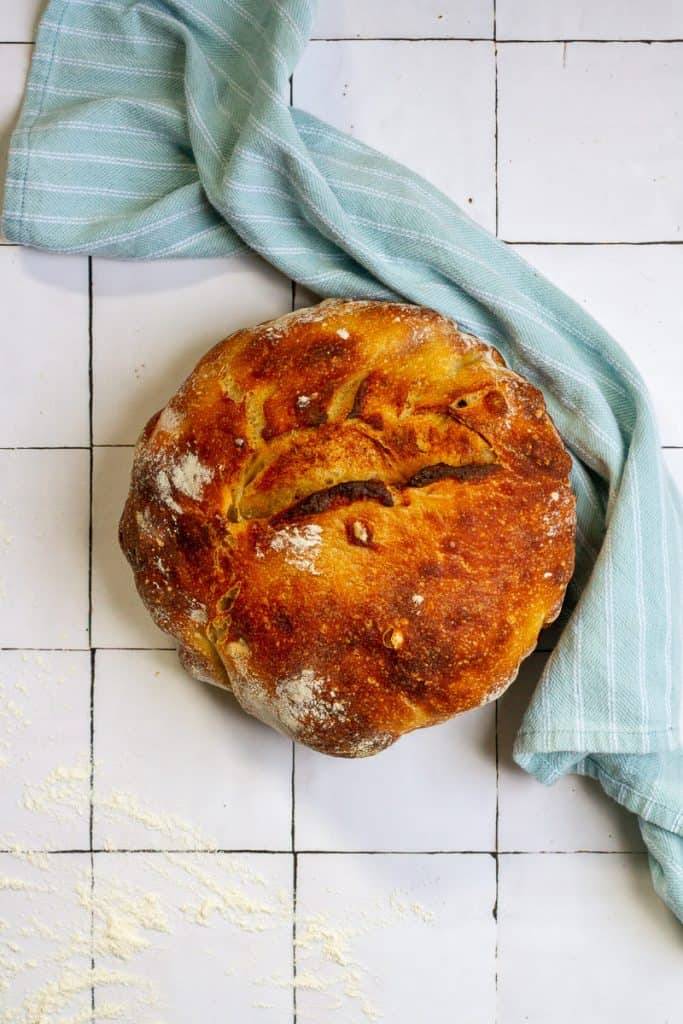
Love sourdough bread? This beginner-friendly, no-knead Dutch oven sourdough bread is an artisan-style loaf. Stretch and fold the dough, proof overnight, and bake it the next morning!
Several years ago, we visited Boudin Bakery in San Francisco.
Ever since, I've had dreams of making my own sourdough bread. Because really good sourdough has such amazing flavor and texture.
But guys, making your own sourdough is something of a time investment. I also found the recipes slightly overwhelming at first.
And then 2020 happened, life changed, and suddenly I had all kinds of time to learn about sourdough! So, that's what I did.
This Dutch oven sourdough bread is a beginner-friendly, artisan-style loaf.
If you've never baked sourdough before, I encourage you to read the entire post and recipe card in full before starting. Make sure you have everything you need before starting and (most importantly) have fun with your bake!
Do I Really Need a Sourdough Starter?
You do.
This bread uses the starter as a leavening agent, and your bread will not rise without it.
Don't have a starter? Check out my kombucha sourdough starter, milk kefir sourdough starter or buy a sourdough starter.

Can I Use Sourdough Discard for This Dutch Oven Bread?
No. This sourdough bread requires an active, fed starter.
If you're looking for discard recipes, check out our pancake recipes: sourdough blueberry pancakes, sourdough pumpkin pancakes, sourdough oatmeal pancakes and gluten-free sourdough pancakes.
What's the Best Dutch Oven for Sourdough Bread?
Ideally, use a heavy Dutch oven that's anywhere from five to seven quarts in size.
Smaller Dutch ovens might not give the bread enough room to rise, and larger ones can allow the dough to spread out too much while baking. The Dutch oven should have high walls, so don't use a braiser.
I use a five-quart cast-iron Dutch oven.
Should I Use an Enameled or Non-Enameled Cast-Iron Dutch Oven?
Use either. If you already own one, you probably don't need to get another one. (Unless you just want to!)
That said, for bread, a non-enameled pot (like my Cuisinart Dutch oven) does have some advantages.
Enameled cookware should not be preheated while empty because the enamel can crack, but you can put your non-enameled pot in the oven empty without a second thought.
Also, enameled cookware tends to have lower temperature ratings than non-enameled. Before purchasing an enameled Dutch oven, check the temperature rating and make sure it can handle high heat.
Can I Make This Bread Gluten-Free?
No.
This bread relies on gluten to provide structure to the dough and bread.
Do I Really Need Bread Flour?
Yes. Bread flour is a high-gluten flour and bakes differently than all-purpose.
Bread flour should be easy to find at your regular grocery store.
It's also easy to make your own homemade bread flour by using all-purpose flour and vital wheat gluten. Check the recipe card notes for homemade bread flour measurements and directions.
This recipe was tested using both King Arthur's organic bread flour and homemade bread flour with King Arthur's organic all-purpose flour and Anthony's vital wheat gluten.
Can I Use This Recipe for Flavored Sourdough?
Yes, you can use this recipe as a starting point and add some of your favorite flavorings.
Check the recipe card notes for flavor addition ideas, or try making rosemary garlic sourdough bread or cinnamon sourdough bread.
How to Make the Dough for Dutch Oven Sourdough Bread
Day 1
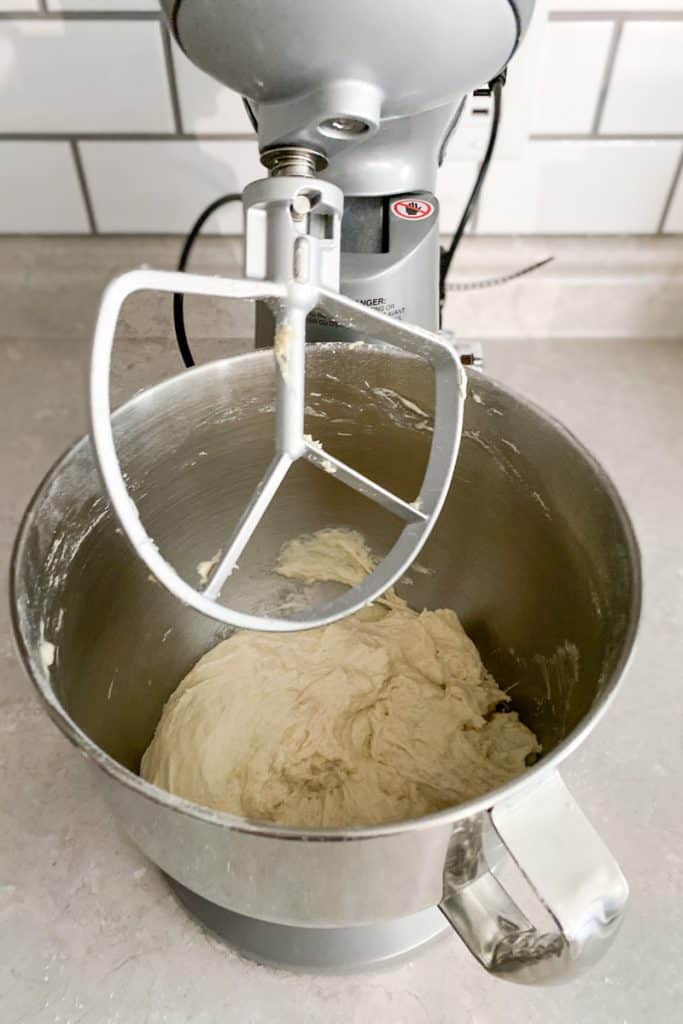
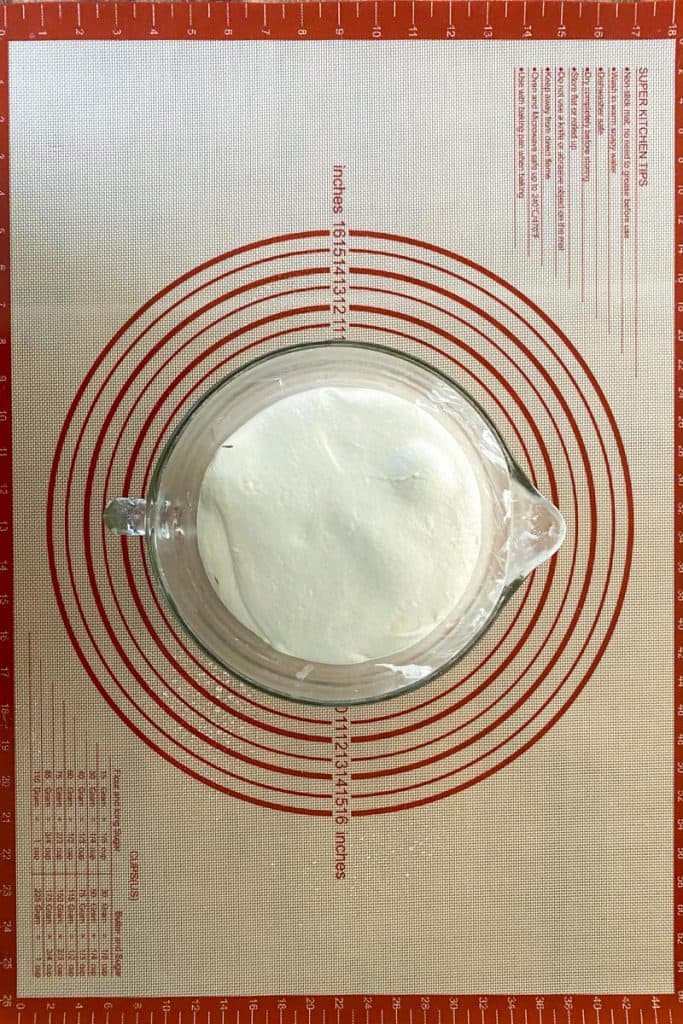
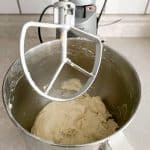
Start by mixing together the sourdough starter, bread flour and water.
I used the paddle attachment on my Cuisinart stand mixer, but you could also use a spoon or a dough whisk. Stir until the dough no longer clings to the side of the bowl.

Autolysis Rest
Now you'll let the dough rest for about 20 minutes.
This is called the autolysis rest. It allows the gluten to begin forming naturally without kneading.
After the dough rests, add the salt. Salt can prevent autolysis, so make sure to add it after.
Rest, Stretch + Fold the Dough
After adding the salt, move the dough to a glass or Pyrex bowl and let it rest again for one hour.
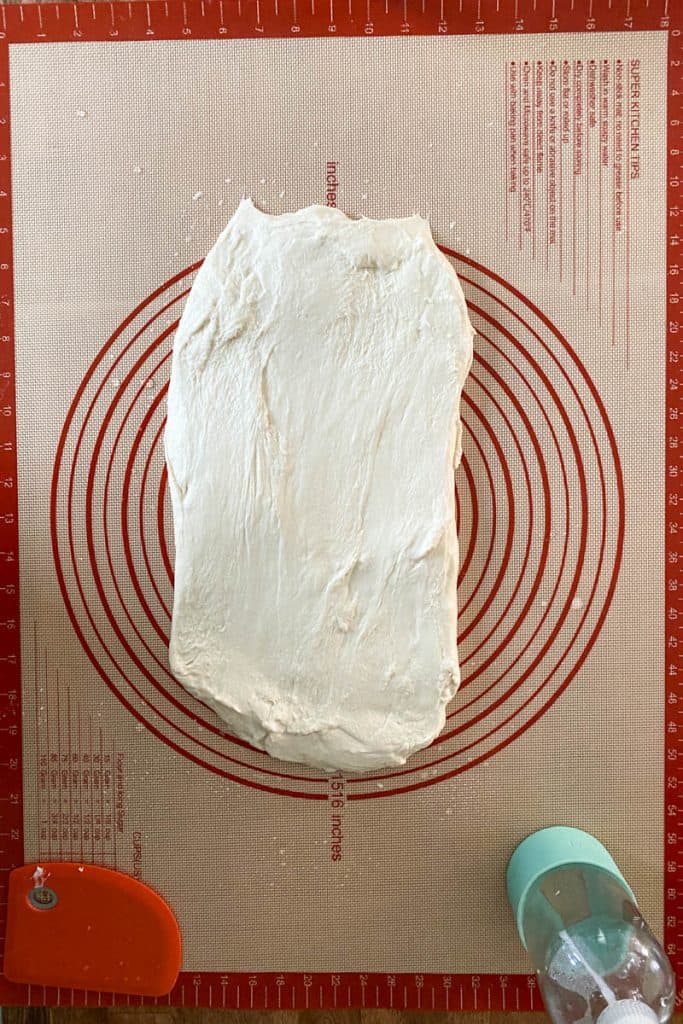
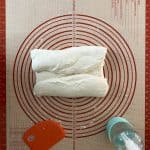
Next, move the dough to a dampened work surface. I like to use a large silicone pastry mat.
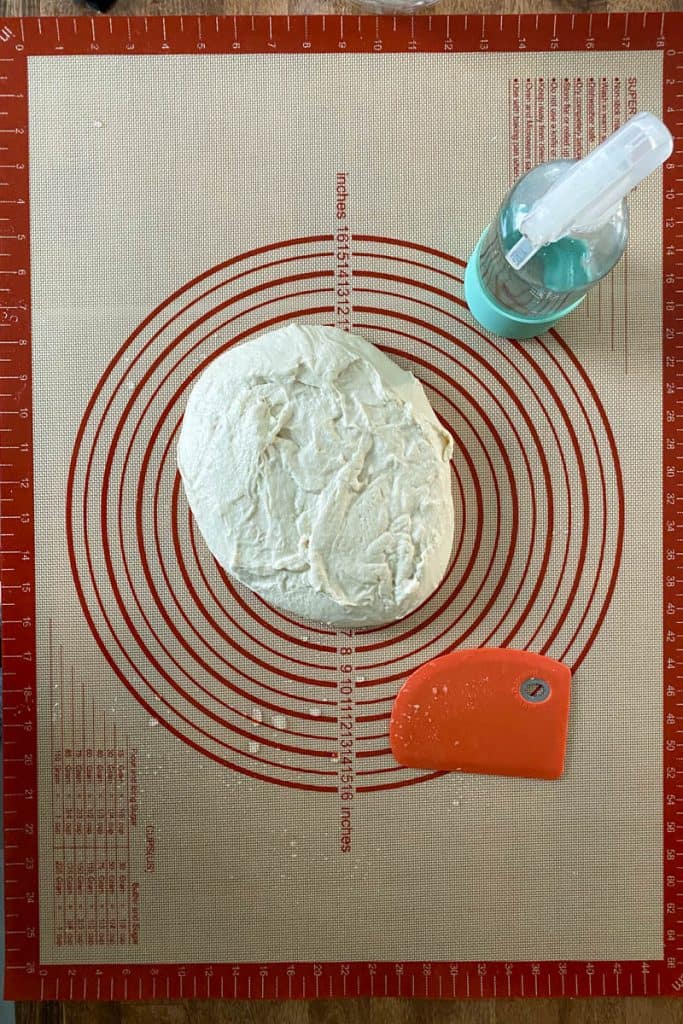
Use dampened hands or a dampened flexible dough scraper to spread the dough out a little.
It doesn't need to be flat at all, just stretched out (kind of like a piece of paper).
Fold the dough in thirds.
I usually fold the top down and then the bottom up.
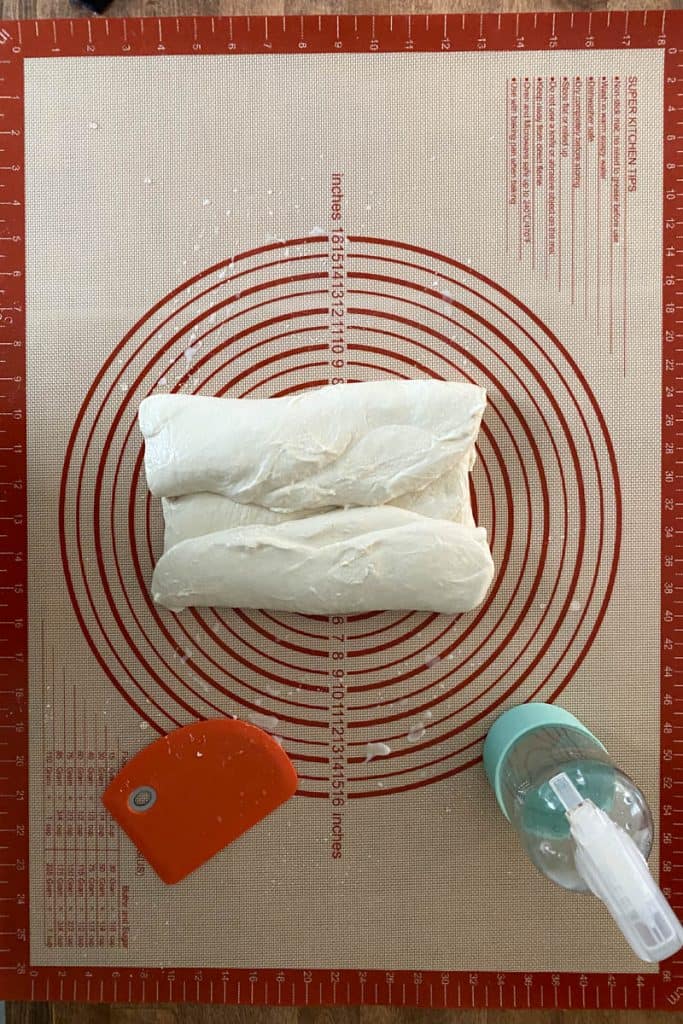
Next, fold the dough in thirds again from the other direction. I fold the left in and the right in.
You'll be left with a (sort of) square piece of dough.
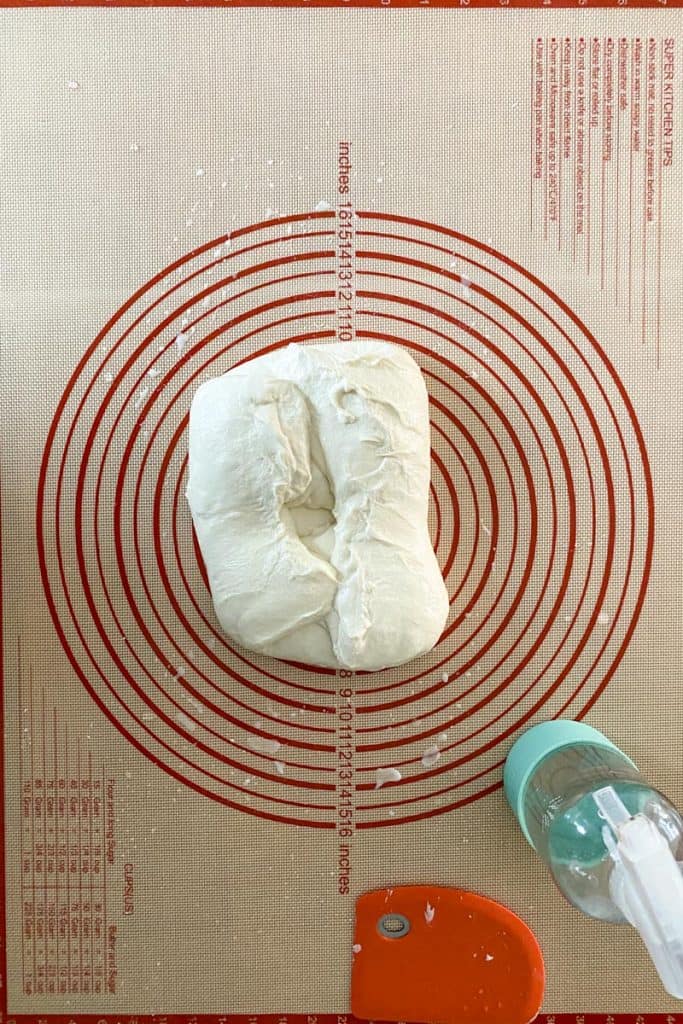
Flip the dough and stretch it the same way on the other side.
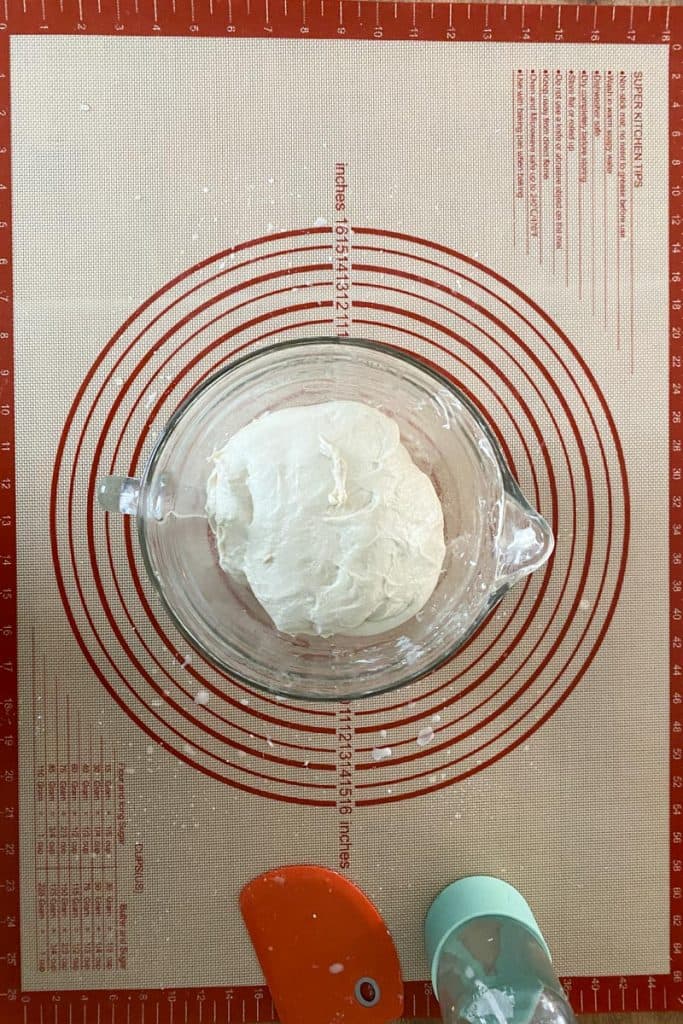
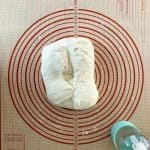
Put the dough back in the bowl.
Repeat the resting and stretching sessions two more times, for a total of three hours total.
Want to take things up a notch? Try sprinkling seasonings over the dough on the third folding. Check the recipe card notes for ideas.
Place the dough back in the bowl to proof. Cover the bowl with a lid, a damp towel or plastic wrap.
Overnight Proof
At this point, you've got two options. You can proof in the fridge or on the countertop.
Refrigerator Proof (The Preferred Method)
If possible, proof your dough in the fridge. You'll leave it there for 8 to 48 hours.
I like this method because it's a little flexible (time-wise) and provides the most consistent results.
Countertop Proof
This method is nice if your fridge is too full for the dough. I speak from experience.
Only use a countertop proof method if your kitchen is 70 degrees Fahrenheit or colder, if you'll be home to check on your dough periodically, and if you won't be devastated if you accidentally over-proof your dough.
For a countertop proof, it's important to check on the dough periodically to see if it's done proofing. It will probably need to proof for about eight hours, but the timing isn't as reliable as a refrigerator proof.
Press on the dough with an oiled or floured knuckle. If the dough bounces back quickly, it's not done. If it's slow to bounce back, it's done.
Once the dough is done proofing, bake it right away. Over-proofed dough can deflate in the oven (sad!) and the flavors might not be as nice.
Bake the Dutch Oven Sourdough Bread
Day 2
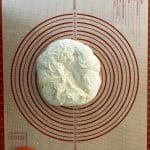
When the dough is done proofing, move the dough back to a dampened work surface.
Form the dough into a ball and let it rest seam-side up for about 15 minutes.
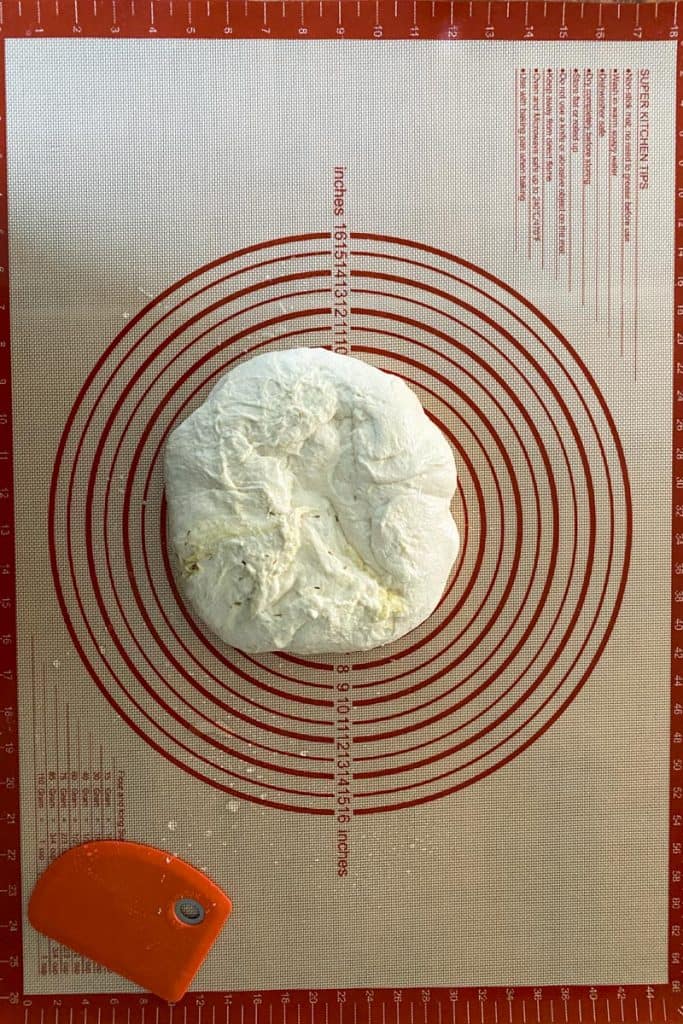
Move the dough onto parchment paper.
If you proofed the dough in the refrigerator, you'll need to let the dough warm up to room temperature for a few hours.

Preheat your oven at least 30 minutes before baking. Some sourdough recipes recommend preheating an hour ahead, but I've found 30 minutes works just fine.
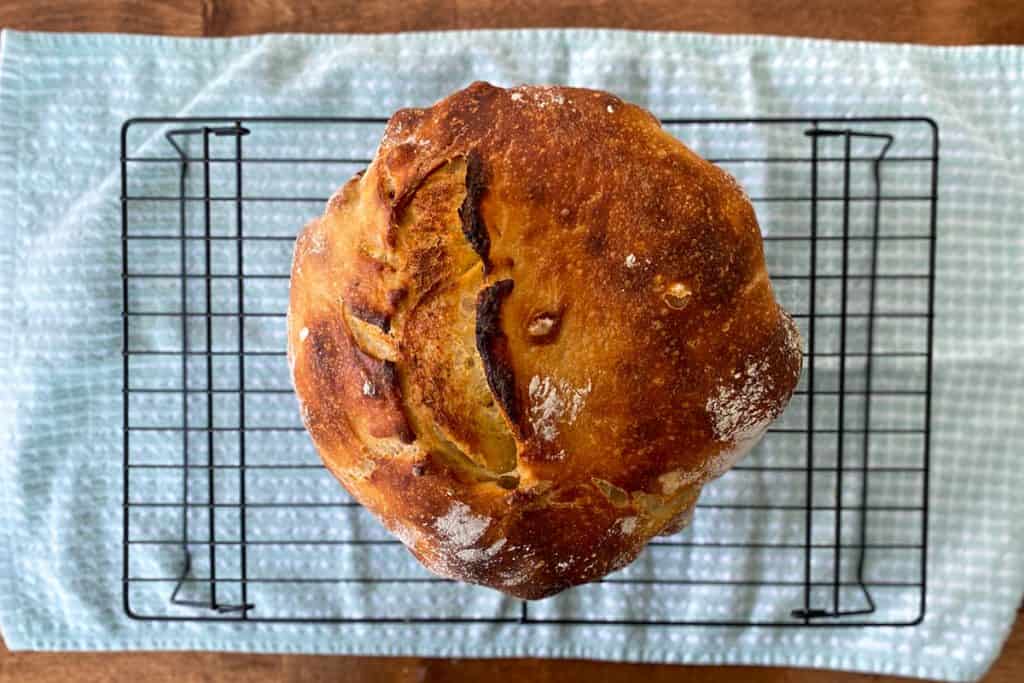
Just before baking, lightly dust the dough with flour and slash the dough with a bread lame or a floured knife.

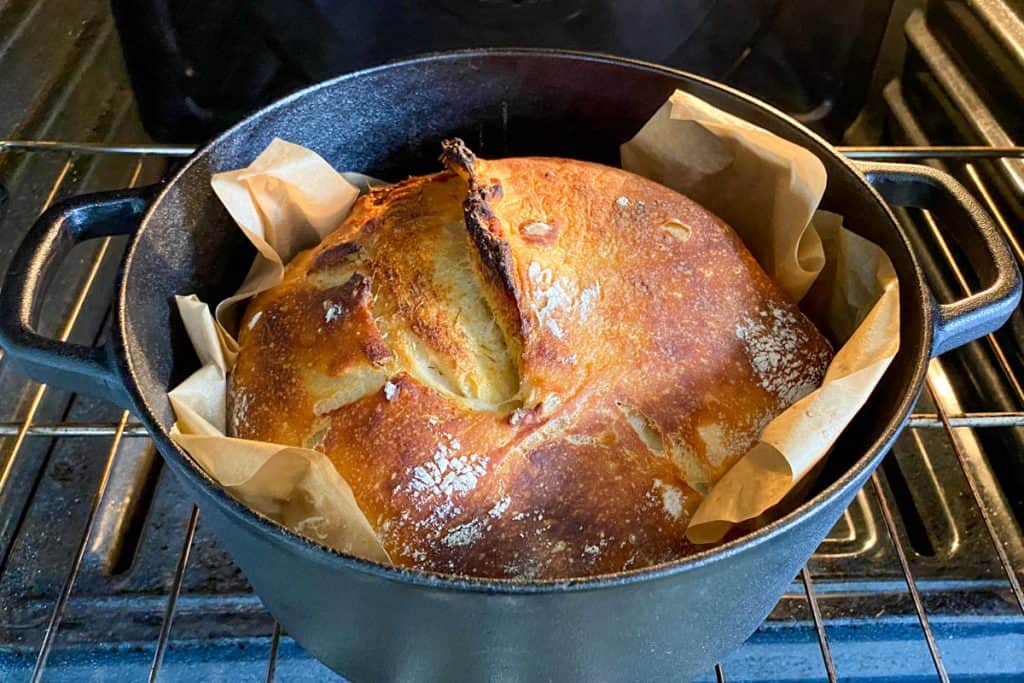
Move the parchment paper and dough into the Dutch oven, spritz the dough with water and cover the pot with a lid.
Lower the oven temperature slightly.

After 45 minutes, remove the lid from the Dutch oven.
Your bread should be golden and slightly pale. Bake for 10 to 15 more minutes.

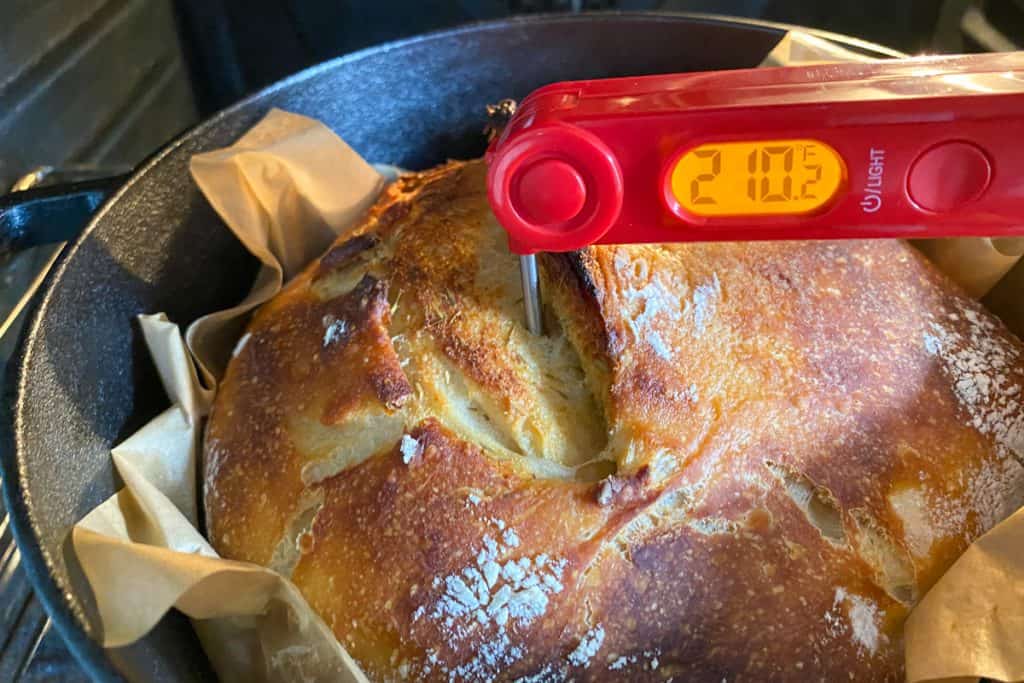
Check on the bread after 10 minutes.
It should be golden brown at this point.
If possible, use a digital thermometer to test the center of the bread.
The bread is done cooking when it reaches 210 degrees Fahrenheit.
Cool the Bread
After baking, it will be very tempting to cut into the bread right away.
Don't!
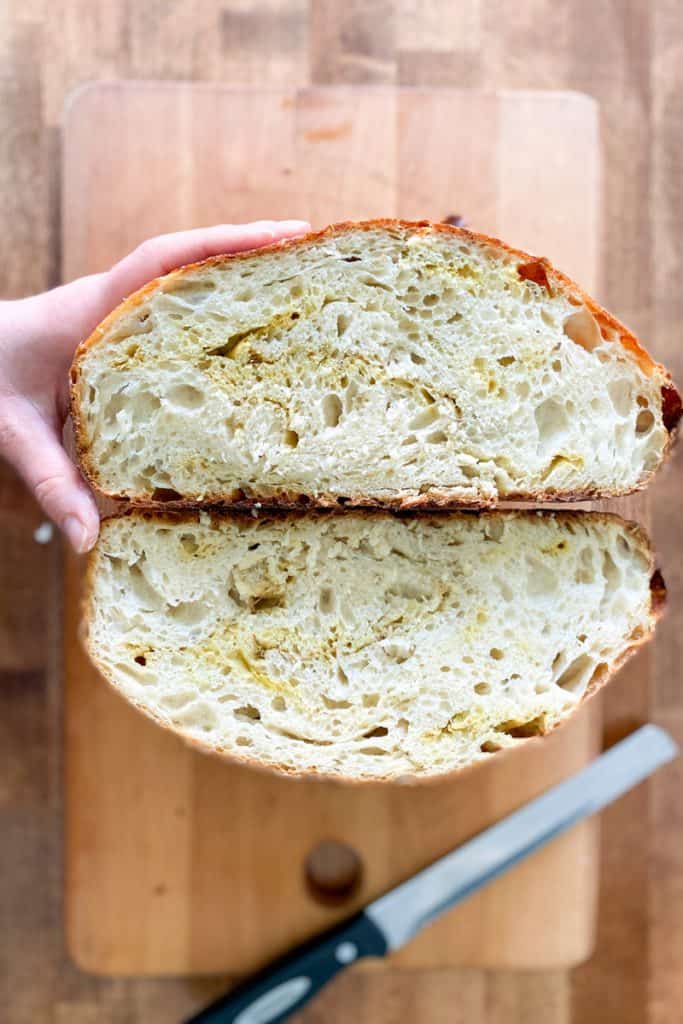
Move the loaf to a cooling rack and let it cool for at least two hours. The bread is still cooking internally and could be gummy if you cut into it too early.
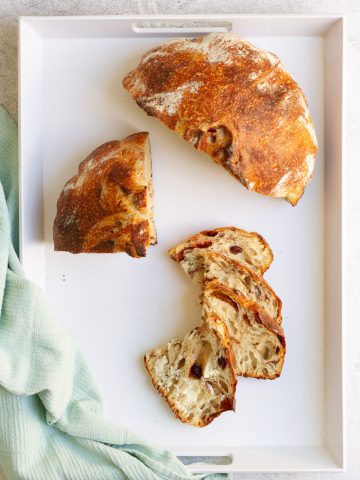
Slice the Bread
Once the bread is cooled, use a bread knife to cut it. I love this Wusthof bread knife.
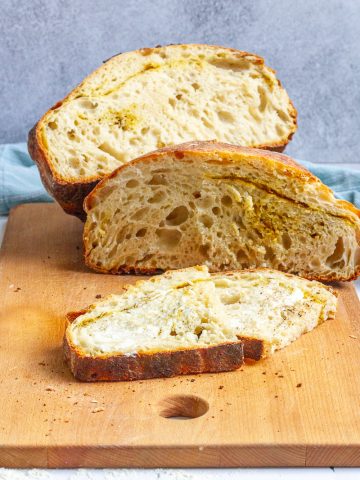
The loaf in the photos below has nutritional yeast folded into it, so you can see swirls of cheesy yumminess.
Serve this Dutch oven sourdough bread along with a warm bowl of soup, like this homemade cream of mushroom soup, vegetable gnocchi soup or this tomato soup (from canned tomatoes).
Dutch Oven Sourdough Bread (No Knead)
Equipment
- non-reactive bowl for proofing (glass or stainless steel)
- spray bottle with water (optional but helpful)
- damp towel or plastic wrap
Ingredients
Sourdough Base:
- 1 cup active (ripe/fed) sourdough starter (227 grams) See "Sourdough Starter" in recipe notes
- 5 cups unbleached bread flour (602 grams) See "Measuring by Volume or Weight" and "Homemade Bread Flour" in recipe notes
- 1¾ cups water (397 grams)
- 1 tablespoon salt (18 grams)
Instructions
Day 1: Make the Dough
- Combine the starter, flour and water in a large bowl or in the basin of your stand mixer. Do not add the salt yet.Use a large spoon or dough whisk to stir the dough together, or use the paddle attachment on your stand mixer to mix on medium-speed for about 60 seconds. Mix until the dough no longer clings to the bowl, and instead forms a ball.Allow the dough to rest about 20 minutes, and then add the salt.

- Incorporate the salt by mixing again with the spoon, whisk, or stand mixer until just mixed. You may need to use your fingers to help work the salt into the dough until you don't feel the salt crystals anymore.Place the dough in a non-reactive bowl (such as glass or Pyrex), and cover the dough with a damp towel. Allow to rise for one hour.
- Spritz a work surface with water and dampen your hands and (optionally) a flexible dough scraper.Gently move the dough onto the work surface. Using your hands or the dough scraper, spread the dough slightly and then fold the dough like a letter. (I fold the upper third down towards the center and then the bottom third up towards the center.)
- Fold the sides of the dough in. (I fold the right third in towards the center and the left third in towards the center.)Flip the dough and repeat the stretching and folding process on the other side.Return the dough to the bowl, cover, and allow to rise for another hour.Repeat the rest and fold period two more times (for a total of 3 hours).
- Return the dough to the bowl and cover with a fitted lid, damp towel, or with plastic wrap.Do one of the following proofing methods (not both):Proof Refrigerated (Preferred Method): Place the dough in the fridge and proof for at least 8 hours, or up to 2 days (48 hours). If you used a towel (instead of plastic wrap) to cover the bowl, re-dampen the towel occasionally. Proof Unrefrigerated: (Only proof unrefrigerated if your kitchen is around 70°F or cooler). Place the dough out of direct sunlight on your counter and allow it to rise for about 8 hours, more or less, depending on the temperature. Check the bread to see if it's finished proofing by pressing the dough with a lightly floured or oiled knuckle. If the dough springs right back, allow it to keep proofing. If it's slow to spring back, it's ready.

Day 2: Finish Proofing + Bake
- Dampen a work surface and your hands.Gently turn the dough out onto the work surface. Form the dough into a ball, place it seam-side up, and cover with a damp towel. Allow the dough to rest for about 15 minutes.Next, use dampened hands to roll the dough into a round ball. Place the dough on parchment paper.
- If you proofed your dough in the fridge: Leave the dough to rise at room temperature until it's no longer cold (about 2½ to 3 hours).If you proofed your dough at room temperature: Leave the dough to rest on the parchment paper while the oven pre-heats, and then you can go ahead and bake.

- About 30 minutes before you're ready to bake, pre-heat your oven to 480°F. If using a non-enameled pot, place the pot in the oven during the pre-heat.Just before baking, lightly dust the dough with flour, and then use a bread lame or a floured knife to score the bread. (Scoring will give steam an outlet and will prevent the bottom of the loaf from cracking.)Scoring can be as simple as one or two long lines across the top. If desired, you can create a pattern while scoring for a more decorative final loaf.

- If you pre-heated the Dutch oven, remove it carefully from the oven. Place the parchment paper and dough into the Dutch oven. Lightly spritz the dough with water, and then add the Dutch oven lid. Slide bread into the pre-heated oven.Lower the oven temperature to 450°F.Bake the bread for 45 minutes covered, and then remove the Dutch oven lid and bake uncovered another 10 to 15 minutes, until the center of the loaf is 210°F. If you don't have a digital thermometer, you can try gently knocking on the bottom of the loaf to see if it sounds hollow.

- Use a spatula, tongs or the edges of the parchment paper to move the bread onto a cooling rack.Wait at least 2 hours before cutting into the loaf. It will be tempting to cut it earlier, but the bread is still baking internally. Cutting early will result in an under-cooked loaf.Store the bread lightly wrapped on the countertop for up to 4 days, or wrap tightly and freeze up to 3 months. I recommend slicing the bread before freezing, so that you can thaw individual slices if desired. Thaw frozen slices by toasting or heating over low heat on a stovetop griddle or pan.

Notes
- A few hours before beginning, I feed my starter with 4 ounces of starter (discarding the rest), 4 ounces flour and 4 ounces water or an unflavored fermented drink (such as plain milk kefir or plain kombucha). (Measurements by weight.) The timing will depend on how active your starter is and the temperature in your kitchen.
- Make sure to use a very active sourdough starter. The size of the starter should (ideally) double within a few hours of feeding and (ideally) the starter should pass a float test.
- To do a float test, pinch off a small piece of starter and drop it in water. If it floats, it's ready. (This test isn't 100% accurate, but it's a good starting place.)
- Measure out 1 cup all-purpose flour. Remove 1 and ½ teaspoons of the flour.
- Add 1 and ½ teaspoons vital wheat gluten to the measured flour.
- Repeat with as many cups as needed or desired.
- Sift the flour together before using. For this recipe, make sure to measure the final amount by weight before proceeding. (Scoop out any extra and reserve for another use.)
- I highly recommend using a digital scale and measuring by weight (grams), not volume, especially if this is your first loaf (and especially for the flour).
- When using the scale, make sure to zero-out the weight of the bowl.
- If measuring by volume, scoop the flour into the measuring cup and then use the scoop to level off the cup. Do not measure by using the measuring cup as a scoop, because your flour will be packed too densely and your measurements will be inaccurate.
- dried herbs and garlic powder
- nutritional yeast
- cinnamon, sugar and raisins
- cinnamon, sugar and dried cranberries
Kelli says
I have made this recipe 4 times. I've added a bit of sprouted whole wheat flour to both the starter and the mix. Perfect. The long cold fermentation is the way to go. I follow this recipe and cold ferment for 48 hours. This is much easier than the traditional sourdough starters and also, the bread is softer than traditional sourdough. My kids and grandkids prefer it. Still same great sourdough flavor with the longer fermentation. Good use for my kefir too.
Alisha Trenalone says
Thank you for letting us know how this recipe worked out for you! So glad you found it easier than the traditional route.
-Alisha at Champagne Tastes
Ben says
Is sourdough generally only made in a dutch oven? I wanna try this, but currently only have bread pans and am not sure how that would affect the bake time and temp.
Alisha Trenalone says
Hi Ben! Sourdough can be baked in a regular bread pan too, but the temperature and cook time would likely need adjusted. We haven’t tried that yet so I’m not sure what the best way to modify this recipe would be, sorry!
-Alisha at Champagne Tastes
Jess says
Hello,
Your recipe says to use 1tbsp of salt but that may be too much for my tastes. Could I use less than that or will it negatively affect the result?
Alisha Trenalone says
Hi Jess, You could experiment with adding less salt, but the salt does play a role in the fermentation process, gluten structure and taste of the loaf. We did not test this using less salt, so I'm unsure what amount of salt you could leave out before your loaf is affected (structurally or taste-wise). If you try, let us know how it goes!
Here's a good guide to help (it's not specifically for sourdough, but the principles still apply): https://www.kingarthurbaking.com/blog/2021/08/31/what-if-i-forgot-salt-or-yeast-in-bread-dough
I hope that helps!
-Alisha at Champagne Tastes