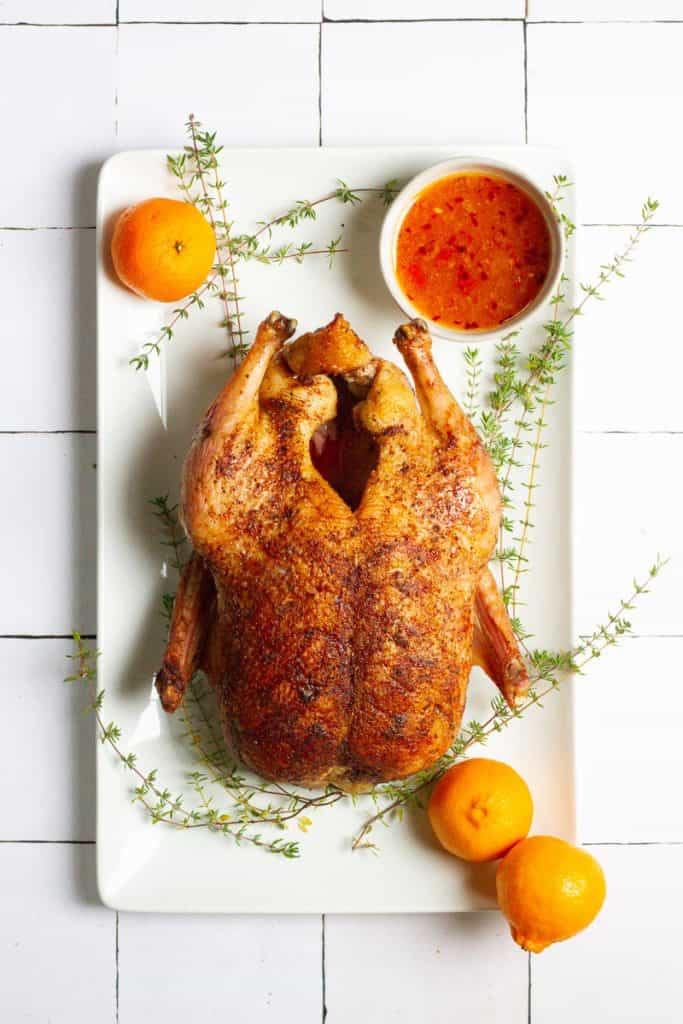
This slow-roasted duck is an easy, low-effort whole duck recipe. The bird is slow-cooked for about four hours until tender, and served with an easy homemade sweet and sour sauce.
Earlier this year, I bought some whole ducks at the grocery store.
I'll admit that I bought whole ducks fully intending to make one of the duck recipes in Julia Child's Mastering the Art of French Cooking.
However, after rereading the (somewhat complicated) recipes, I got a little overwhelmed.
Sorry, Julia! I'm sure if you could walk me through it in person it would turn out perfectly, but for now I'll save those recipes for another day.
Instead, I opted for an easier, more fool-proof duck-cooking technique — slow-roasted duck.
This slow-roasted duck is rubbed with warming spices, cooked until the meat is tender and the skin is crispy, and served with a quick and easy sweet and sour sauce.
Can I Use Wild Duck (Game Meat)?
Yes, you can! Just bear in mind that a wild duck will likely be much smaller and will cook more quickly than one you would buy.
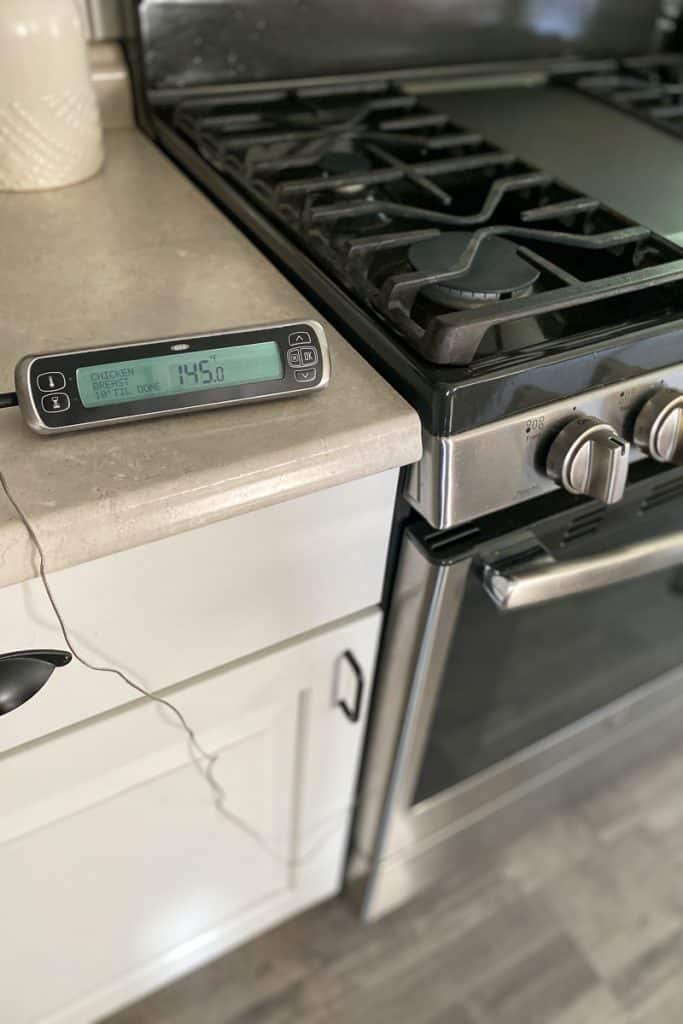
If you're going to use wild duck, I would definitely recommend using a leave-in digital thermometer (with an alarm, if possible) to avoid over-cooking!
How Long Does This Slow-Roasted Duck Take to Cook?
It depends.
If you're using a convection oven setting, it will take about 2-½ to 3-½ hours, depending on the size of the duck.
For a standard oven, it will take around 4 to 6 hours, again depending on the size of the duck.
This is not a fast recipe, but it is relatively hands-off.
For a faster recipe, my go-to is this seared duck with mustard sauce.
Should I Use a Convection Oven or Standard Oven?
This is totally a personal preference, and either will work perfectly.
If your oven has a convection oven setting, that option will be fastest and will yield the crispiest duck skin.
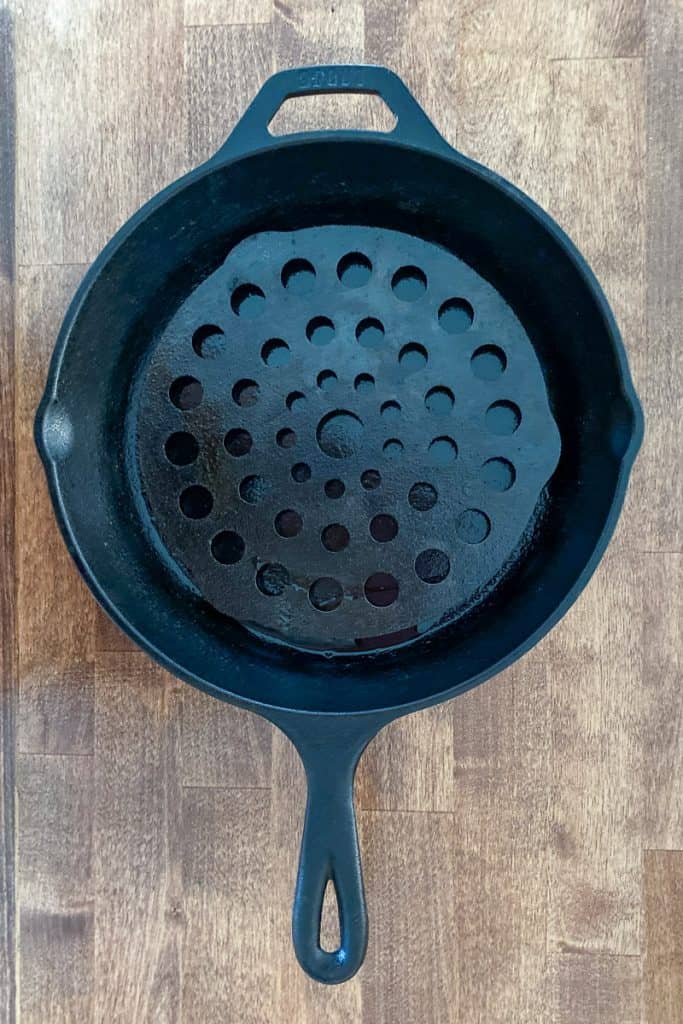
Do I Need Special Equipment for this Slow-Roasted Duck?
You'll want a sturdy knife to trim the duck wings (before cooking) and carve the duck (after cooking). I recommend an 8-inch chef's knife or a carving knife.
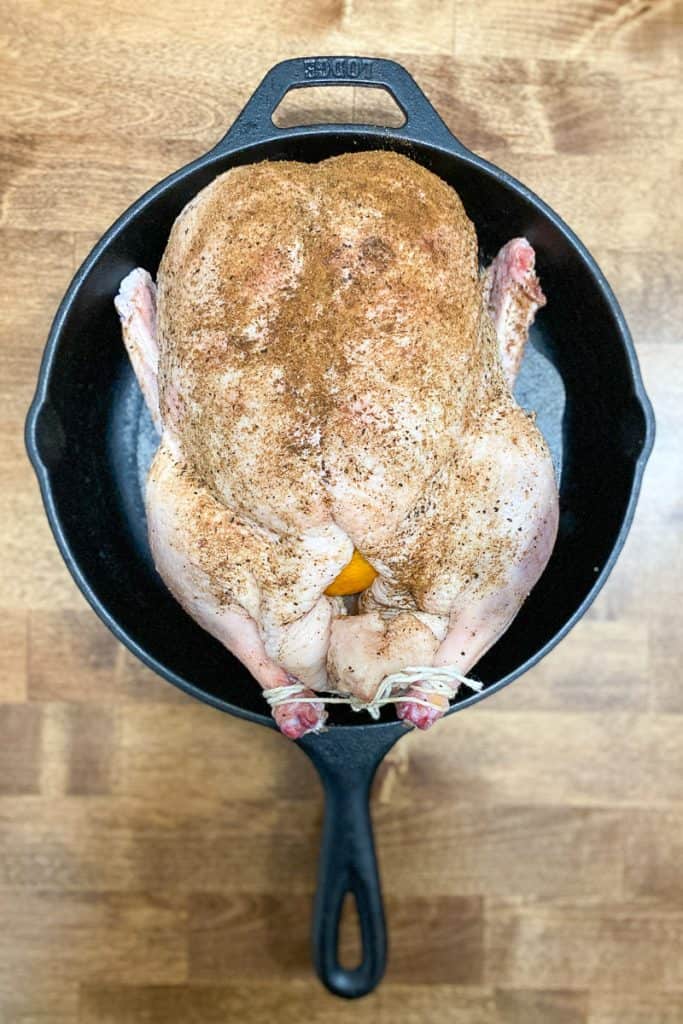
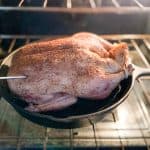
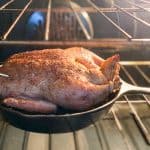
A roasting pan with a rack will help raise the bird out of the pan, but if you don't have one, a 12" cast-iron skillet with a cast-iron meat trivet will work perfectly.
I used a cast-iron skillet and a cast-iron meat trivet in the photos.
One other thing you might want is a leave-in digital thermometer. It's not totally necessary, but it will allow you to ignore the duck for long periods of time without worrying that it's over-cooking.
I use this OXO leave-in thermometer and love that it beeps at me when my food is almost done cooking.
A regular digital thermometer, or an upgraded high-end one like this OXO instant-read digital thermometer, are also great options. You'll just need to remember to check the temperature periodically.
How to Get the Crispiest Duck Skin
Duck is known for both its oily, juicy meat and (when roasted) its crispy skin. But getting the skin crispy isn't always easy.
Why not?
The crispy skin relies, in part, on getting the duck skin dry before cooking.
If it's an option, you can buy an air-dried duck. These are somewhat hard to find where I live.
For those of us buying duck at the grocery store, it's very common to see duck that is already wet-brined. That means the duck has already been brined in a solution of salt and water.
The photo below shows an example of what wet-brined duck packaging looks like. Notice the packaging area that reads "seasoned with approximately 12% of a solution of water and sea salt."
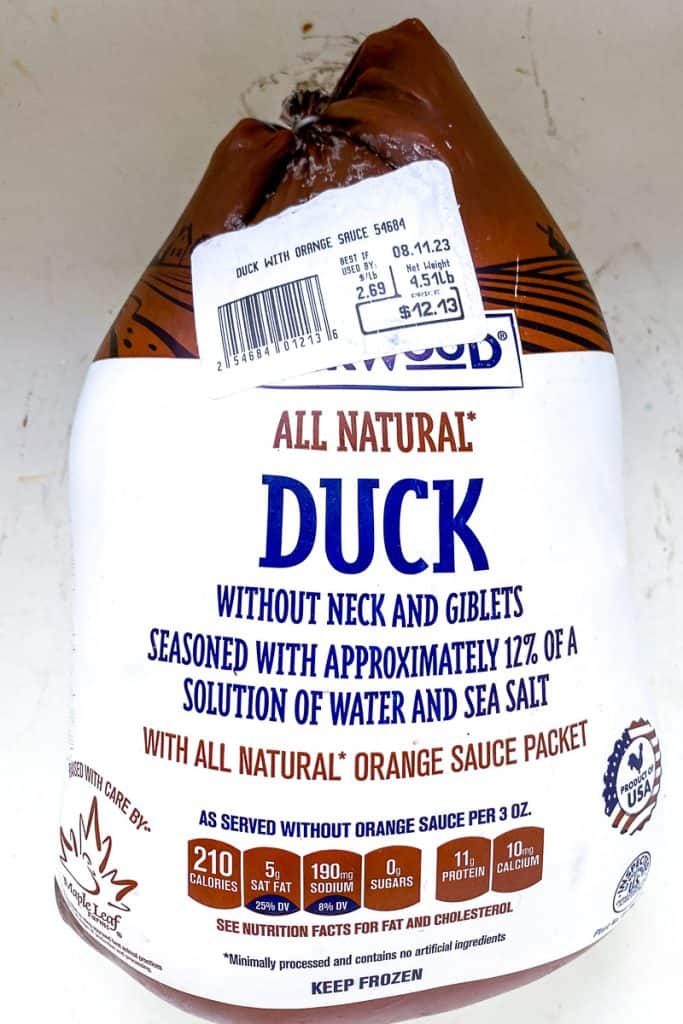
When a duck has been wet-brined, it's more difficult to get the skin dry. And therefore, more difficult to get the skin crispy.
So is there any point in buying a wet-brined duck?
Yes, absolutely!
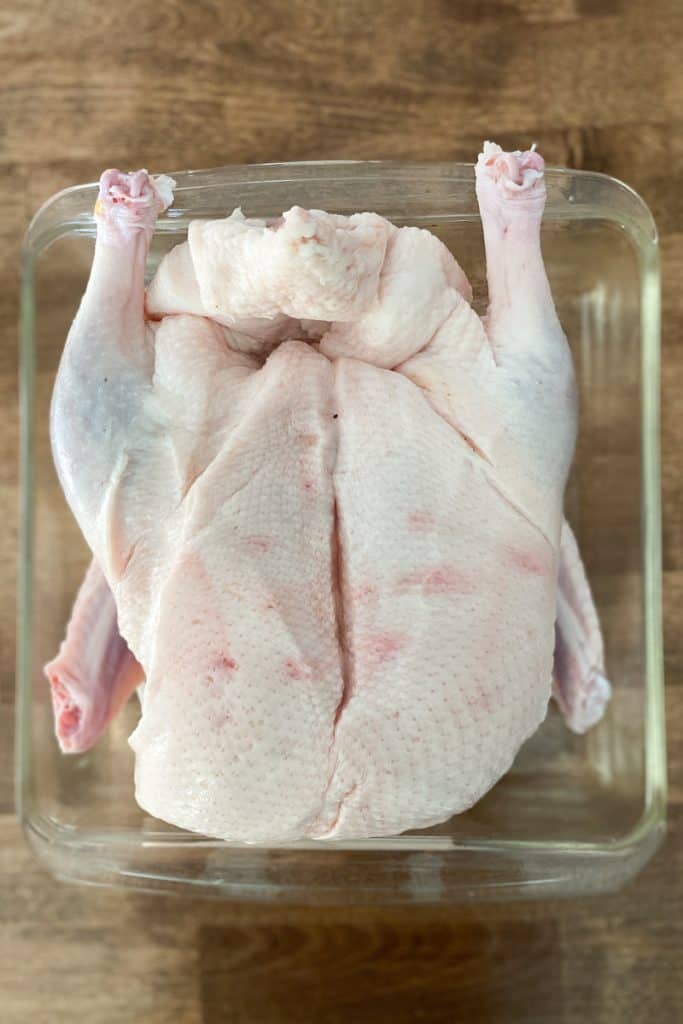
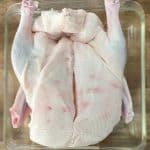
How to Dry Duck Skin in the Fridge
An easy way to dry out the duck skin before slow-roasting (even if the duck has been pre-brined) is to chill the duck unwrapped in the fridge overnight.
Simply place the duck in a casserole dish and slide it into the fridge overnight.
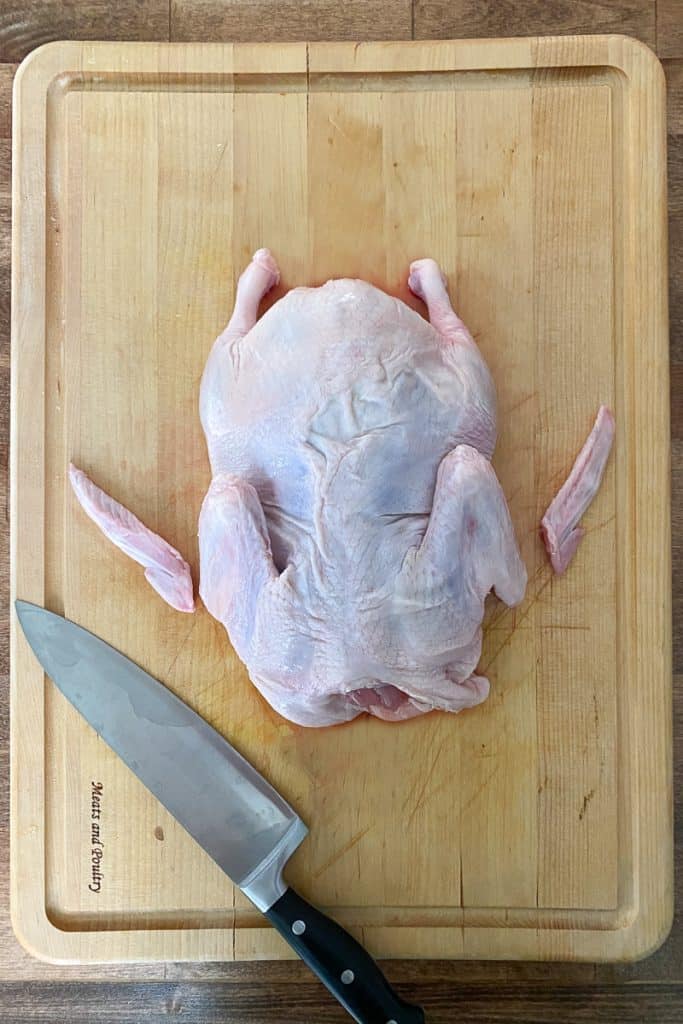
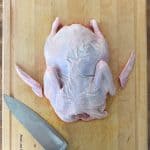
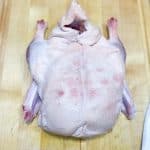
Preparing the Duck To Be Slow-Roasted
Before cooking the duck, trim off the bottom half of the wings. This section is almost all bone.
Next, use a paring knife to make tiny holes in the duck skin along the drumsticks and the meaty side of the duck.
Hold the knife at an angle, cutting through the skin but not the fat underneath.
Why make holes in the duck skin?
There's a thick layer of fat underneath the skin. As the duck cooks, it will render and drip through the holes into the pan below.
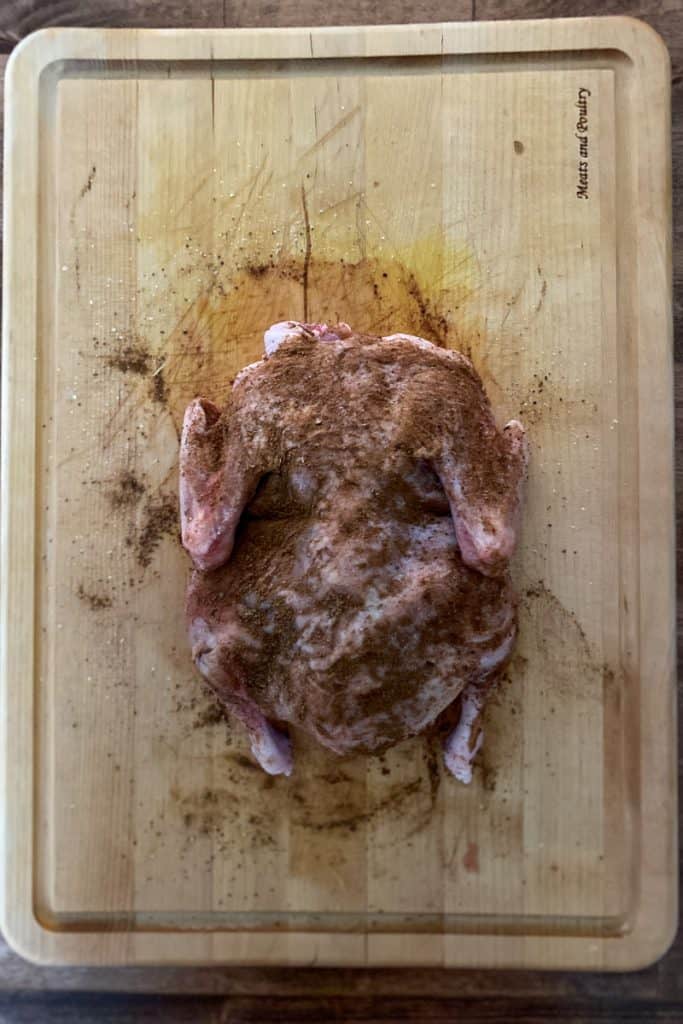
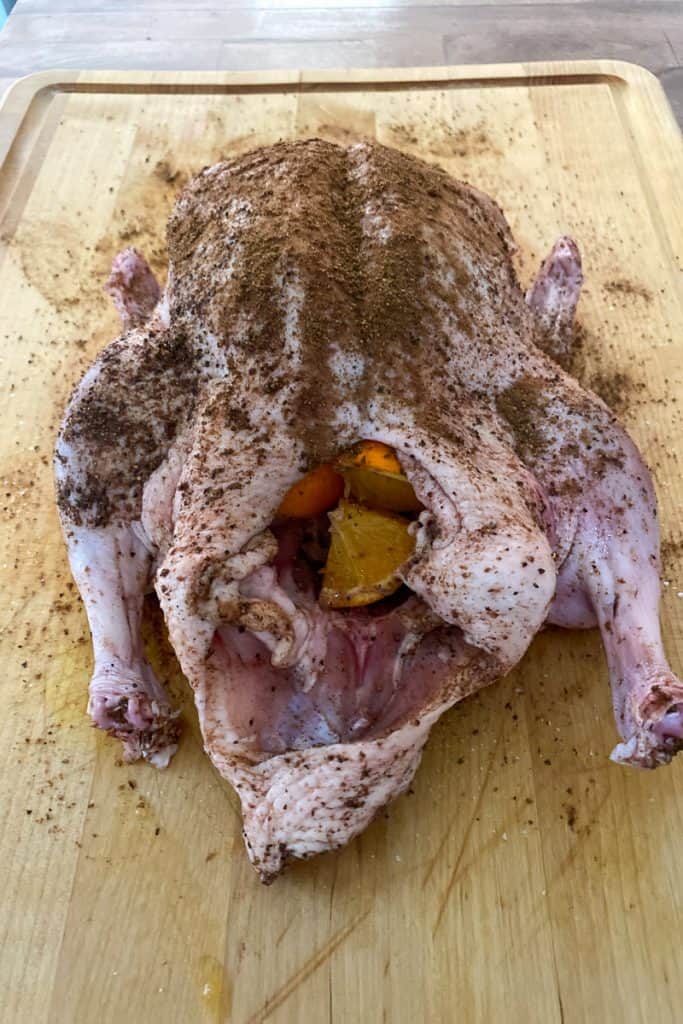
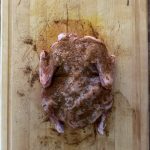
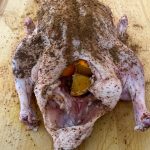
Season the Whole Duck
Next, salt the duck (both the outside and inside the cavity).
Rub garam masala onto the outside of the duck.
Next, stuff orange wedges into the duck cavity.
If it seems like they won't fit, flip your duck around and try the other side. The cavity opening on the neck side is a lot smaller than the opening on the tail side.
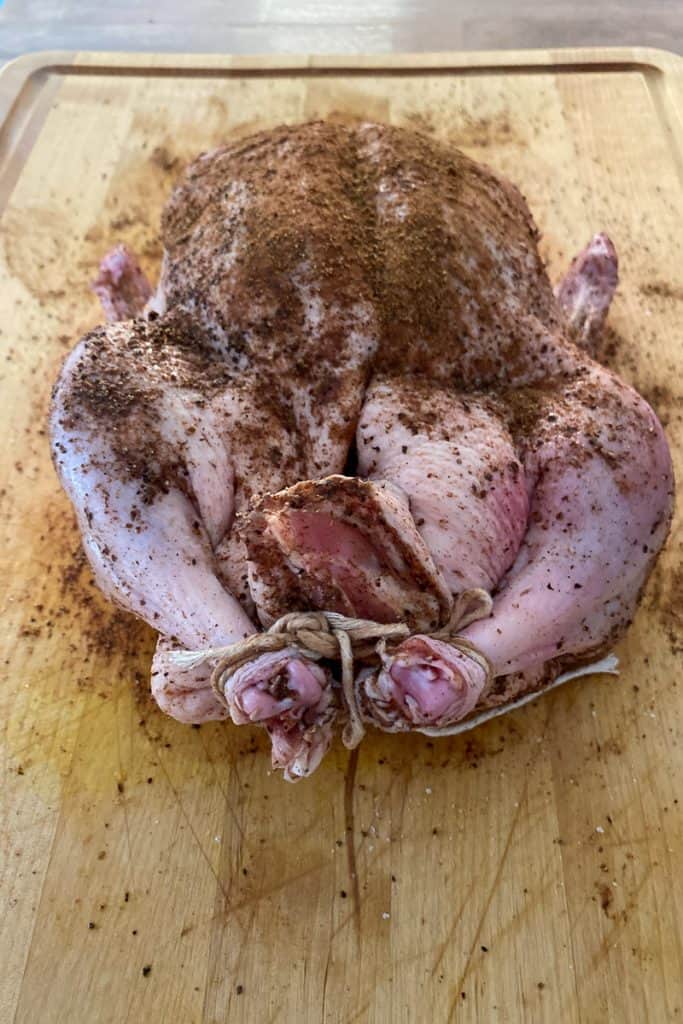
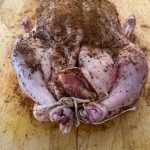
Truss the Duck (or Not)
There are complicated ways to truss a bird, and (quite honestly) I haven't mastered them.
Here's what you need to do for this recipe: either tie the legs together with twine (to hold the cavity closed), or skip that altogether and just pin the cavity closed with a toothpick. Either option will work; the goal is simply to keep hot air from going into the duck cavity.
Does the Duck Really Need to be Cooked Meaty-Side Up?
Yes (and no).
Place the duck meaty-side up (spine-side down) on a roasting pan rack (or on a meat trivet in a cast iron pan).
Why does it matter how you place the duck in the pan?
Since you'll be cutting meat from primarily one side of the duck, placing it meat-side down will mean the wrong side of the duck will get crispy.
That said, I've made this mistake! We still happily ate the tender duck meat, but the skin wasn't crispy.
So if you accidentally cook your duck upside down, no worries! You'll know better for next time.
Slow-Roasted Duck
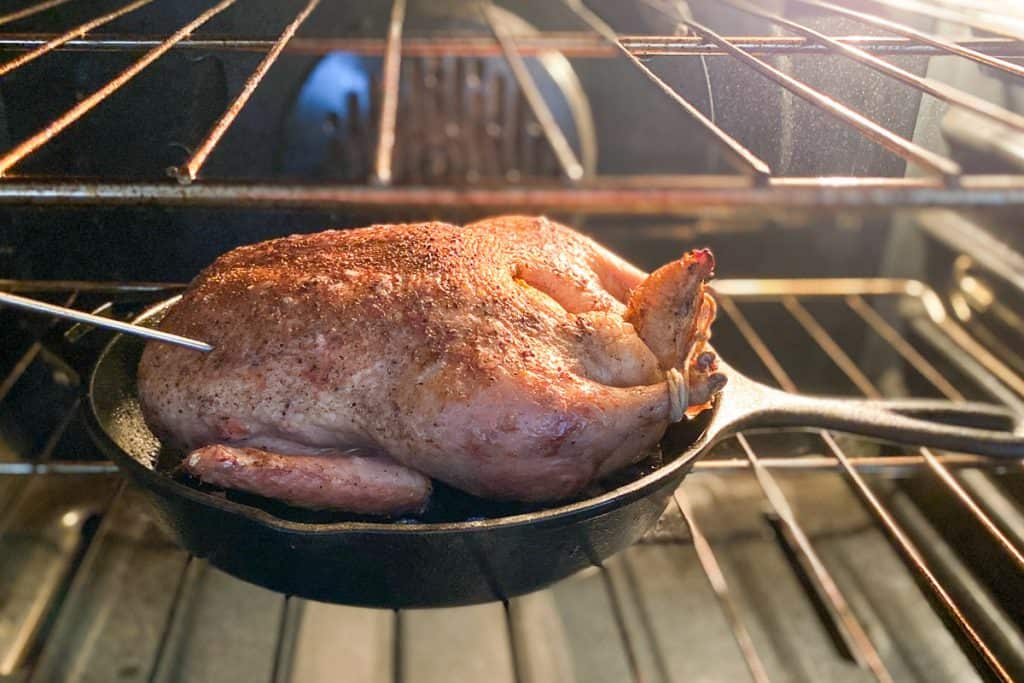
Slide the duck into the oven. Cook at 250 degrees Fahrenheit until the internal temperature reaches 145 degrees Fahrenheit.
Once per hour (for a standard oven) or once every 30 minutes (for a convection oven), pull the duck out of the oven and poke holes in the skin again. This will help the fat escape from below the skin.
When the bird reaches 145 degrees Fahrenheit, crank the heat up to 500 degrees Fahrenheit (or as high as your oven will go) to help crisp up the skin.
Cook about 15 more minutes, or until the bird reaches 155 degrees (medium-well) or 165 degrees (well done).
Rest the Duck
Once the bird comes to temperature, pull it out of the oven.
Transfer the bird to a cutting board. I use poultry lifters to move the bird easily.

Let the duck rest for at least 15 minutes (but 30 minutes is better).
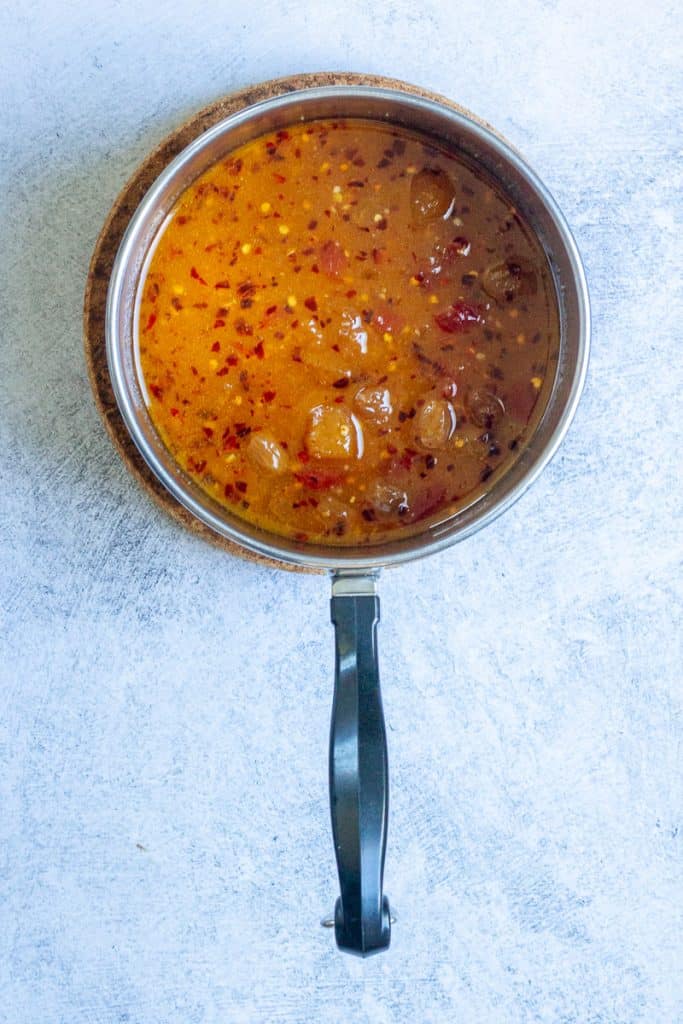
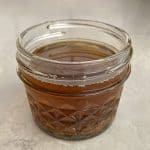
Make the Sauce
While the duck rests, pour the duck fat out of the pan into a glass jar. There will be quite a bit of fat!
You'll use a little bit of the duck fat in the sauce, but make sure to save the rest for another use. For example, toss these crispy oven fries in duck fat before baking, toss these roasted potatoes in duck fat before cooking, or use duck fat instead of butter when making egg in a hole.
Add one tablespoon of the duck fat along with the remaining sauce ingredients to a saucepan. Heat the sauce on the stovetop until it comes to a simmer, and then continue simmering for a few minutes.
Turn off the heat and set the sauce aside until you're ready to serve.
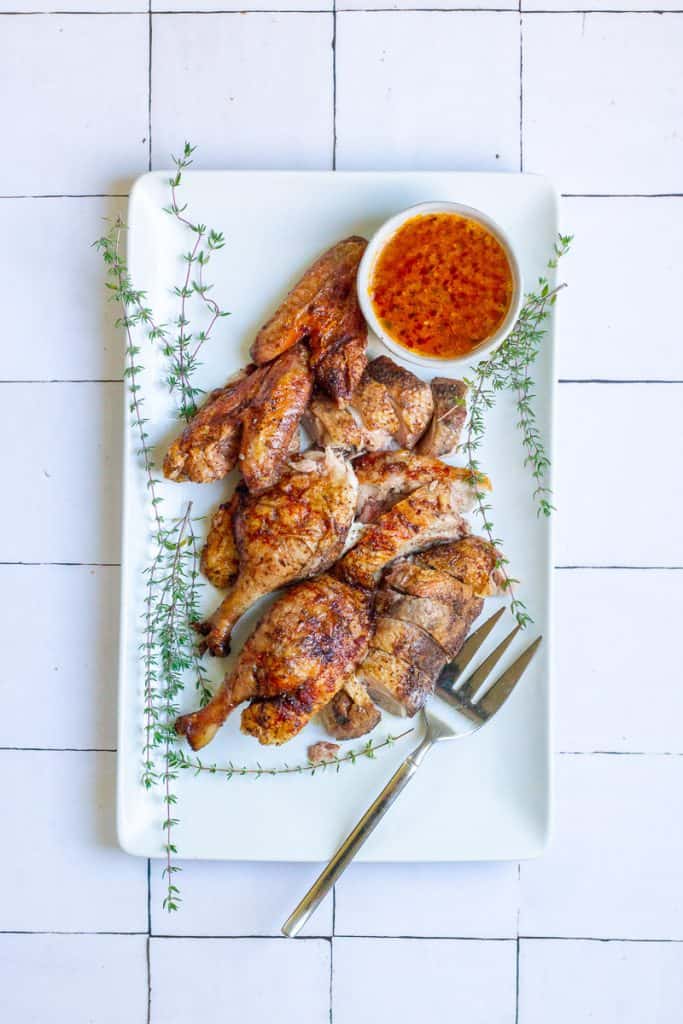
Once the duck has rested, it's almost ready to serve!
Carve the duck, or gently tear apart the duck meat. Tearing the meat will be easier if you've used a standard oven setting instead of a convection oven, because the meat will almost be falling off the bone.
Serve this slow-roasted duck along with the sweet and sour sauce and your favorite sides. I like to pair it with an easy vegetable side, such as this raw brussels sprout salad or this spinach mandarin orange salad.

Slow-Roasted Duck with Sweet + Sour Sauce
Equipment
- roasting pan (with rack) OR cast iron skillet with meat trivet
- kitchen twine (or toothpick)
- digital thermometer (leave-in if possible)
Ingredients
Slow-Roasted Duck:
- 4½ - 5½ pound duck Neck + gizzards removed. Duck completely thawed. (See recipe note "What type of duck?")
- 1 tablespoon sea salt Or less, see recipe note "How much salt?"
- 2 teaspoons garam masala (optional) Or use Chinese 5-spice
- 1 orange, cut into 8 wedges Or ~3 mandarin oranges, halved
Sweet + Sour Sauce:
- 1 tablespoon rendered duck fat (from the pan) Or use toasted sesame oil
- ¼ cup rice vinegar
- 2 tablespoons mango chutney Or use orange marmalade
- 2 teaspoons fish sauce Or use soy sauce
- ½ teaspoon red chili flakes Omit if your mango chutney is spicy
- 1 garlic clove, minced
Instructions
Prepare the Duck:
- Optionally, place the duck breast-side up (spine-side down) in a glass casserole dish and set uncovered in the fridge for 8 to 24 hours. This will help dry out the duck skin so that it gets crispier while cooking.For the best results, pour off as much of the liquid from the raw bird as possible before placing in the glass dish.If your bird was wet-brined (many store-bought ducks are), this optional chill time is highly recommended to help dry out the skin.
- Cut off the lower parts of the wings. (This section is almost all bone.)Check the neck and cavity, and trim away any loose fat (if present). Check the base of the tail and remove fat glands (if present) and any yellow residue. (Many ducks from the supermarket will already have the fat trimmed.)
- Place the duck breast-side up (spine-side down) on the cutting board.Use a sharp paring knife, held at an angle, and prick the bird at half-inch intervals down the thighs, back and the lower part of the breasts. This step will help the fat drain from behind the skin while cooking.If your bird has exceptionally thick skin (or if your knife is a little dull), skip this step for now and prick the skin after the bird has been in the oven about 30 minutes.
Season the Duck:
- Season the duck liberally with the sea salt. Sprinkle it over the outside of the bird and in the cavity. (If your bird was wet-brined in water and salt, it will need less salt than indicated. Refer to the recipe notes.)If using, rub the garam masala evenly over the outside of the bird.
- Add the oranges to the cavity.(If it seems like the oranges won't fit, your bird is backwards. Flip the duck around and try the cavity on the other side next to the legs.)
- Use kitchen twine to tie the duck legs together (to keep the cavity closed), or secure the cavity with a toothpick.(You do not need to perfectly truss the bird, you just want to secure the oranges and prevent hot air from cooking the inside of the duck.)
Cook the Duck:
- Place an oven rack in the center of the oven. Preheat oven to 250° Fahrenheit. (Both standard oven and convection oven directions follow.)Place the duck breast-side up (spine-side down) on a roasting pan with a rack, or set in a cast-iron pan with a meat trivet added. (The rack or trivet will raise the bird up so that it's not resting in duck fat while cooking.)Put the duck in the oven and roast 4 to 6 hours (standard oven) or 2½ to 3½ hours (convection oven), depending on the size of the bird. If you've got a leave-in thermometer, add it now.If using a standard oven, pull the bird out of the oven and prick the skin again to help release the fat once per hour. For a convection oven, prick the skin every 30 minutes. As the bird cooks, pay attention to areas where the fat is staying thick (and not releasing), and make sure to poke holes in those areas.
- When the duck skin is thin and most of the fat has rendered, or when the bird has reached approximately 145° Fahrenheit (medium-doneness), increase the heat to 500° Fahrenheit and cook about 15 more minutes to crisp up the skin.Optionally, check to see if the duck has reached an internal temperature between 155° Fahrenheit (medium well) to 165° Fahrenheit (well done). See recipe notes.
Finish the Duck + Make the Sauce:
- Carefully transfer the bird from the roasting pan to a carving board, and let rest uncovered for at least 15 minutes. (A 30-minute rest is preferable if you've got time.)Pour the rendered duck fat from the roasting pan into a glass jar. Measure out 1 tablespoon of the fat for the sauce. Let the remaining fat cool, and then store in the fridge for another use.
- While the duck rests, add all the sweet and sour sauce ingredients to a saucepan. Stir and bring to a simmer. Continue simmering for about 2 minutes, or until the sauce begins to thicken, and then remove from heat.

- Cut open the trussing twine (or remove the toothpick) and carefully remove the orange segments using a fork or tongs. The oranges will be hot! Discard the oranges, or, optionally, squeeze their juice into the sauce.Carve the duck or gently tear it apart. Move the duck to a serving platter. Serve immediately along with the sauce.Store leftovers in the fridge for up to 2 days, or wrap tightly and freeze for up to a month. To reheat, place on a baking sheet and place in a 475° Fahrenheit oven for 10-15 minutes, until warm.

Notes
- A standard oven will take a lot longer to cook the duck, and the texture of the meat will be exceptionally soft. You'll likely be able to tear the meat instead of cutting if desired.
- A convection oven will cook the bird more quickly, will help make the skin as crispy as possible, and the meat will still be tender and juicy. You'll likely need to cut the meat, as it will be slightly less "fall-off-the-bone" tender.
- Either option works well. A convection oven is my personal preference.
- This recipe was tested using Pekin duck. (Most ducks available in American grocery stores are Pekin duck.)
- If using wild duck (game meat), your bird will likely be much smaller and will cook more quickly. I highly recommend using a leave-in digital thermometer (with an alarm, if possible) to avoid over-cooking.
- If using table salt, use half the salt (1 and ½ teaspoons salt)
- Many store-bought ducks are already wet-brined with salt. (The label may read "seasoned with water and sea salt.") If your duck is brined, use half the amount of salt called for (1 and ½ teaspoons sea salt)
- Look for an air-dried duck. (These can be hard to find.)
- If your duck was brined before purchase, it may be harder (but not impossible) to get the skin extra crispy.
- Chill your thawed duck uncovered in the fridge for 8 to 24 hours before cooking. This will help dry the skin. (Dry skin = crispier skin.)
- If possible, use a convection oven setting to cook the bird.


Jessica says
Delicious!
Alisha Trenalone says
Thanks!!
-Alisha at Champagne Tastes